Spring is here and what better way to brighten your home up in time for summer than a fresh coat of paint. But, before you slap a coat of paint on the wall, there are a few things you need to know about painting to make sure you get it right the first time and don’t end up with a DIY disaster!
Painting seems easy. Get a brush, get a tin of paint and you’re away. Not quite. Painting is deceptively challenging but with a few handy hints, we’ll have you on your way to a bright new room in no time.
Prepare yourself, prepare your room and prepare your materials. Preparation is key on any DIY project but with painting, it’s paramount. In fact, all the ‘hard work’ is in the preparation. Putting the paint on the walls should be the easy part!
First, you’ll need to prepare yourself. What type of project would you like to tackle? Are you repainting a chair or a room? If this is your first painting project, try to start small or at least with just one room. Don’t try to repaint your entire house all at once! Keep in mind that different projects will require different types of preparation and paint, so decide on the project before you go out and buy materials. For the rest of this guide, let’s assume you’ve decided to paint a small room but keep in mind that alternate projects and surfaces may change the types of materials and techniques required.
Set aside ample time for your project. You should be able to repaint a small room in a weekend if the surfaces are ready to go but always allow extra time in case something tricky comes up.
Draw up a budget; it doesn’t need to be extensive, but thinking through the materials you will need and costing them out will prevent any nasty surprises at the hardware store checkout. Painting supplies can be costly, and all those brushes, rollers and masking tape can add up. Here’s a handy list of supplies you may need for your painting project.
Measure your room to work out how much paint you need. You can do this by calculating the surface area of the room in square metres; you’ll be able to take this measurement to your local paint supplier or hardware store and they’ll help you determine how much paint you need to purchase.

To calculate the square metres in your room, measure the length and width of each surface and multiply them by each other. Work it out wall by wall. For example, your first wall may be 3.00m long by 2.4m high, giving you a measurement of 7.2sqm for that wall. Calculate the rest of the walls in the room and then add them all together. Make sure you account for any windows, doors, closets etc in the space.
Don’t forget the ceiling! If you’re just repainting the walls, that’s fine but you may wish to repaint the ceiling, in which case, remember to calculate that too. If you are using one type and colour of paint you can add all these measurements together and you’ll be able to figure out how much paint you need. However, you may decide on a colour scheme with a feature wall or with contrasting skirting boards and/or cornices and trim. If this is the case, you will need to keep these figures separate so that you can get the right amount of paint for each part of your room.
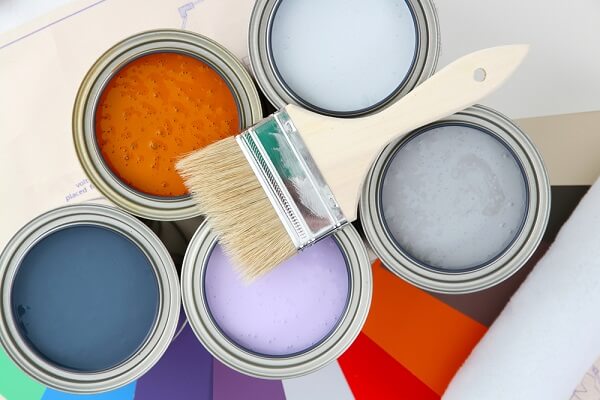
Colours are important. Whether you’d like to give your room a facelift with a bright, clean white or warm it up with a buttery yellow, you should take some time to contemplate your colour scheme. Colours impact space in a variety of ways. Lighter shades tend to make a space feel bigger while darker shades can make spaces feel smaller or more intimate.

Consider the purpose of the room and what sort of mood you’d like to create in it. If you’re interested in creating a clean, sophisticated look, stick to neutrals like white, grey and taupe. Yellows are good for happy, activated spaces like kitchens. Greens are invigorating and often suit office/work spaces. Blues and browns are calming and good for bedrooms. Keep in mind that bold colours often work better as accents; you’ll be less likely to get sick of a bright red pillow as opposed to a bright red feature wall!
You may be surprised by the variations in simple colours, like white. You’ll find a selection of cool whites, warm whites and bright whites and it’s often difficult to make a decision in the store. Once you have decided on a few colour options, we recommend buying a few sample pots to test in your room.
Create colour swatches by painting a few medium sized pieces of wood with your sample colours. We do not recommend painting swatches directly on the walls as it may create an uneven surface for future painting and, if they are dark colours, may require more coats of paint to cover them up later.
Paint colours may change depending on the time of day and the light within a space as well, so be sure to look at your swatches in your room, on every wall, at different times of day and in different lighting situations (e.g. natural sunlight versus at night).
If the room is large, consider warm, darker shades to make the room feel cosier. If the room is small, consider cool, bright tones in lighter shades to make it feel larger. In a small room, paint the ceiling a bright white in ceiling matte paint. Painting the ceiling with a colour, even a lighter shade of colour, will make the ceiling feel lower and may close-in a room too much. In a larger room, you have more leeway, but often a simple white ceiling is the most suitable option as well.
Colour isn’t your only decision when it comes to paint. You’ll also need to choose a paint type. This may depend on the area that you are painting. Exteriors need a UV and weather resistant paint while interiors need interior paint. There are many types of interior paint. Some paints are water-based while others are oil-based. Oil-based paints are considered more durable but they take longer to dry and are more difficult to cleanup (you will need to use turpentine or mineral spirits to clean up brushes etc). However, these hard-wearing properties make oil-based paints a good choice on skirting boards, windows and door frames. Many paint brands offer a durable water-based alternative, for example, Dulux Aqua-enamel.
Bathrooms and other ‘wet areas’ like laundries will need paint suitable for wet or moist areas or they may peel when exposed to moisture.
Undercoats are important. Undercoats or prep coats, done correctly, will save you time, money and frustration in the long run. Not all surfaces are created equal; wood reacts differently to paint than plaster which is different from metal and gyprock. Walls that have already been painted will also react differently to paint. An undercoat seals the new or original surface; if the surface is porous, it may ‘suck up’ the paint. Better to do this with a basic undercoat (which may be less expensive) than the pricey main paint. Undercoats can also seal in smells and stains, like those created during smoking and cooking. Undercoats are particularly important if you are going from a darker to a lighter colour in your room. Dark colours may seep through and you’ll need more coats to cover it up. Undercoats prime the surface, making it a better surface to work with during the main painting stages.
You’ll also have a choice of finishes for your main paint: matte, low sheen, satin semi-gloss and gloss. From matte finish (sometimes referred to as ‘flat’ wall paint) through to gloss, you have a range of ‘sheens’ available in your paint.
If your design aesthetic is a bit bolder, you may consider a textured paint finish. These finishes range by brand but to give you an idea, you can have a stone finish, pearl finish, rusted finish, suede finish or metallic finish. You can even paint a chalkboard on the wall!
Remove any furniture that may be obstructing access; if you have nowhere else to put your belongings, try grouping them together in the middle of the room. Make sure you cover everything with old sheets or drop clothes to avoid paint splatters or damage. Use drop cloths to cover the floors.
This is the part that will take up the majority of your time. Assess the project carefully and assemble your required materials. If your wall has existing hooks, remove them. If it has wallpaper, you’ll need to remove that too. Here’s a great guide for removing wallpaper. It’s a good idea to remove any blinds or window coverings before painting to ensure they don’t get damaged.
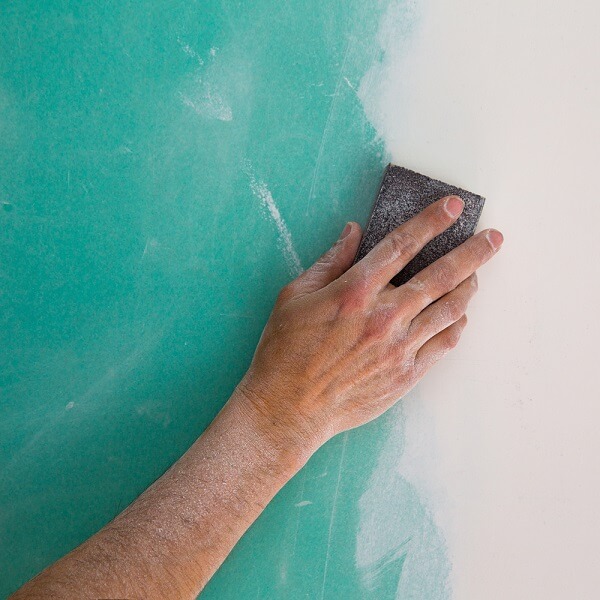
Once you’ve removed any obstructions from the walls, it’s time to patch up any holes, dents or imperfections. This is also the time when you should sand any gloss or semi-gloss painted surfaces (like window frames, trim and skirting boards). Although most modern interior walls will already be coated with an acrylic (water-based) paint, if you are painting in an older house, it is worth check whether the wall paint is oil or water based, as oil-based wall paints may require a light sanding back or a special oil-based primer. You can quickly test this with a cotton ball and rubbing alcohol. If the paint comes off, it’s acrylic, if it doesn’t, it’s either oil or lead based (although lead based paints are less and less common these days.).
There are different types of patching putty; the type you use depends on the material you are patching. Check with your local hardware store to make sure you select the right type for your surface(s). You’ll need to let the putty cure (or dry); curing times will vary by product so follow the manufacturers guidelines. Once dry, you’ll need to sand back the patches to smooth the surface for painting. Start with a medium grade sanding paper or sanding block. If you’re finding the patch difficult to sand pack, try a courser grade of sand paper.
Once you’ve patched and sanded all your surfaces, it’s a great idea to wipe down all the walls and vacuum the room. Hot water should be enough to collect the excess dirt and dust, although you may also use sugar soap for a more thorough clean.
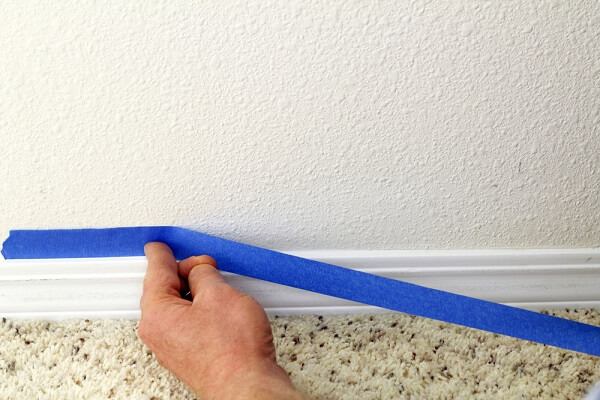
Nope, you’re not ready to paint yet. It’s time to mark out your room. Use painter’s masking tape to mark out around windows, door frames, cornices and skirting boards. Painting is a bit similar to colouring in and you need to paint ‘between the lines’. Marking out will make this easier for you.
Ok, now it’s time to paint, so get your paint tin and stir the paint as per the manufacturer’s instructions. Be thorough. Place a portion of paint in a small, flat bottomed container (disposable takeaway containers are great for this) and ready your angled brush. Cutting in is the process of painting around the edges of your room; abutting the cornice and the skirting boards and getting into corners. Your roller won’t be able to reach the very edges of your room and if you try, it will end up looking very messy. Take your time during cutting in but don’t take too long, you want to get your first coat of wall paint rolled on before the cut in paint has thoroughly dried to make the join appear more seamless. Take cutting in and painting your room wall by wall or section by section. Don’t try to cut in the entire room all at once.
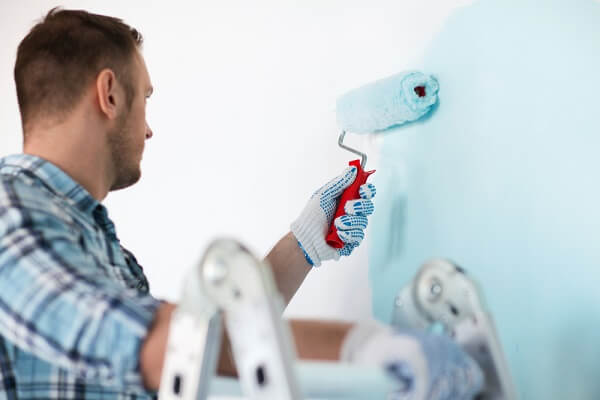
Ok, now let the real fun begin. Ready your roller and paint tray. Make sure you’ve selected the right roller for your paint and wall type. Rollers come in different ‘naps’ – shorter naps for glossy paints and longer naps for matte and low sheen; ask your local paint store or hardware professional for recommendations, as the nap of the roller may significantly affect the finished product. Place the roller on the roller frame (the thing with the handle). Fill your paint tray but do not over fill it – leave a few centimetres of room at top of the tray. Dip the roller into the paint gently and roll across the grooved bit of the tray. The first time you use your roller, you may need to do this several times to make sure you roller is evenly covered with paint. You do not want your roller to be dripping with paint though. Once saturated, paint your walls in zig-zag strokes or the W technique. If your paint begins to run, go over the area in parallel strokes. Recoat the roller with paint periodically.
Depending on the temperature, acrylic paints take around 25 minutes to touch dry and most are able to be recoated after two hours. Bear in mind that you will need at least one coat of undercoat or primer and two or three coats of your colour before the job is done. Remember to cut in before each recoat too.
Keep the room well ventilated. Wherever possible keep windows and doors open. Take period breaks away from the paint fumes; even low VOC, low fume paints can ‘go to your head’ after prolonged exposure.
Periodically clean your brushes, especially whilst cutting in. After half an hour or so, your paint will begin to dry on the lower part of the brush bristles (the bit closest to the handle), so rinse your brush thoroughly to avoid damaging the bristles, as you’ll need them in good condition for an even brushstroke.
If you are taking breaks, you can wrap your brush or roller in plastic to keep it ‘fresh’ between washes or coats of paint. Plastic wrap, rubbish bags and plastic grocery bags work well for this – just make sure they are wrapped and well sealed so that little or no air can get to the paint on your roller or brush.
Crank the tunes. There’s a reason for the phrase ‘like watching paint dry’. Painting is fun but can get a bit tedious partway through the job, so make sure you’ve got a killer playlist to keep you motivated when your energy lulls.
Rope in a friend or family member and not only will the job go more quickly, it will be more enjoyable while you’re working.
Once your final coat of paint is dry, you can remove the marking out tape. Move your furniture back in. A new throw cushion or piece of art may complement the new paint job nicely, so save a little room in your budget for a few new pieces of decor and start loving your new space. Happy painting!